User Manual

Download the Tarken mobile app:
Installation instructions

1. Turn the handle to horizontal position and rotate handle screw cover until the screws become visible.

2. Remove screws and handle.
NB! Keep the screws, as they will be needed later to install Tarken device.

3. Open Tarken screw cover by pressing the button with your finger while gently pulling it outward.

4. Install the Tarken device: ensure that the screw holes on the Tarken align with those on the window. The back of the device should be against the window frame.
NB! Ensure the device is oriented correctly according to your window opening direction.

5. Insert previously removed screws into the Tarken’s screw holes. Tighten both screws clockwise until the device is securely fixed against the window frame.

6. Reattach Tarken screw cover by inserting the retaining pins into their corresponding holes.

7. Mounting anchor will connect Tarken with window frame. This must be glued to the window frame:
- Attach the mounting anchor to the device hook (on the back of the device). Anchor will open if you press the button on the top.
- If the anchor is attached to Tarken, you can see exactly where it will be glued on the window frame. NB! Clean the surface of the window frame with a cleaning wipe and dry it.
- Remove the protective film from the anchor sticker.
- While keeping the anchor vertically aligned with the Tarken device, gently push the window to ensure the anchor adheres to the window frame.
- Press firmly on the anchor and wait 15 minutes for the sticker to dry before using the device (1)
(1) If the sticker does not adhere well to rough surfaces, you can ensure it stays in place by securing it with a countersink screw through the center of the mounting anchor (after you have positioned it).

8. This is what Tarken looks like with the window closed after successful installation.
To charge, connect a 5 V power source to the USB-C port on the side of the device. A yellow LED on the front panel shows that charging is in progress; the battery is full when the LED turns off. With normal use, Tarken is designed to run for up to around one year between charges. The temperature reading may increase temporarily while charging.
User manual
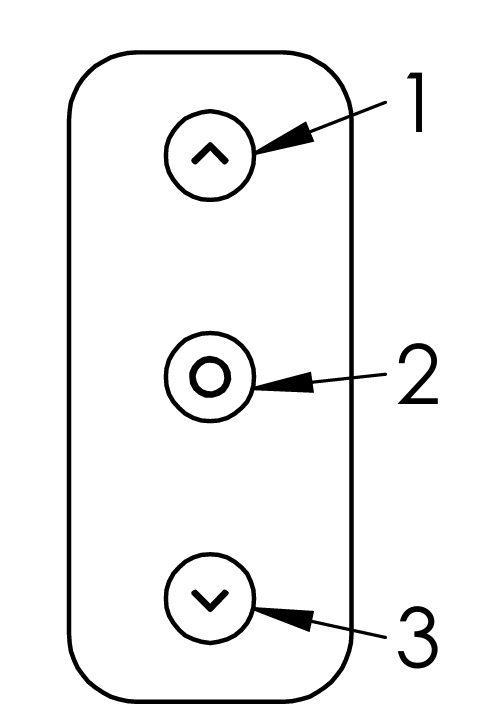
Tarken has three buttons on the front panel for opening, releasing, and closing the window.
Hold the center button (2) for 3 seconds to turn the device on. Hold it for 10 seconds to turn the device off; the red LED blinks while the device powers down.
- Press the upper arrow button (1) to move the window to the tilted ventilation position
- Press the center button (2) to release the window for manual turn-opening
- Press the lower arrow button (3) to close the window
Press any button while the window is moving to stop it immediately.

Releasing window
To release the window press central button (2).
To open the window completely, wait until Tarken has pushed it slightly open, then press the anchor button and manually pull the window open.
To close the window again, hold down anchor button and gently connect Tarken hook with anchor. Then release anchor button and press close button.
Application guide
To connect Tarken, download the Tarken app from Google Play or the App Store.
To pair the device, open the app and tap the gear icon in the upper-right corner to open the Settings menu.
Then select “Scan for devices” and follow the directions in the app.
The device remains in pairing mode for 1 minute after being powered on, indicated by a blinking blue LED.
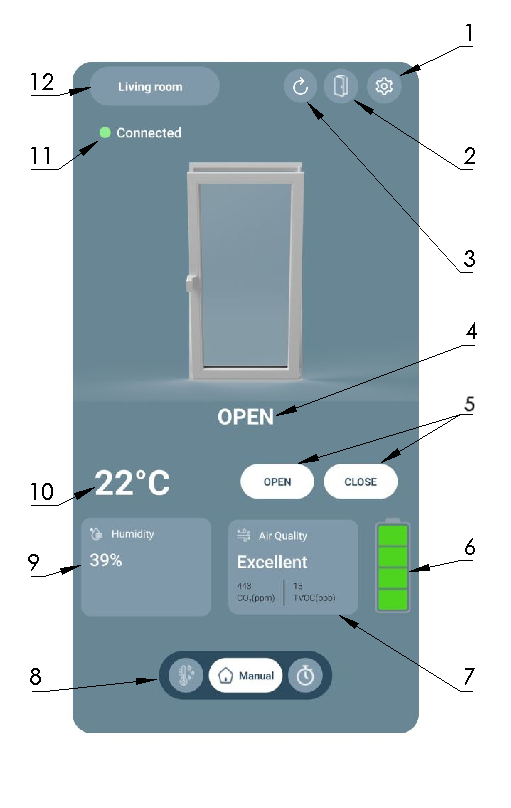
Main view
- Settings
- Window full opening (release)
- Pairing with last device (visible only if device is not connected)
- Window position status
- Window open and close command
- Battery level
- Air quality indicator
- Mode selection
- Room humidity
- Room temperature
- Connection status
- Device selection
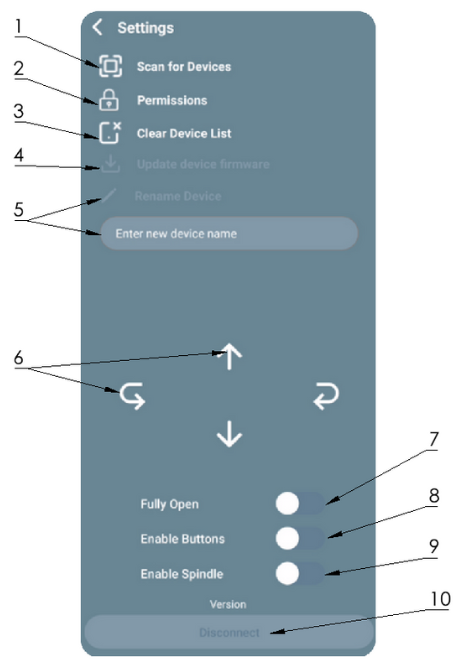
Settings
- Search for available Tarken devices
- Manage permissions
- Remove paired devices
- Update the connected device firmware
- Rename the connected device
- Move the device axes manually
- Change the opening distance
- Enable or disable the physical buttons
- Enable or disable spindle locking
- Disconnect the connected device
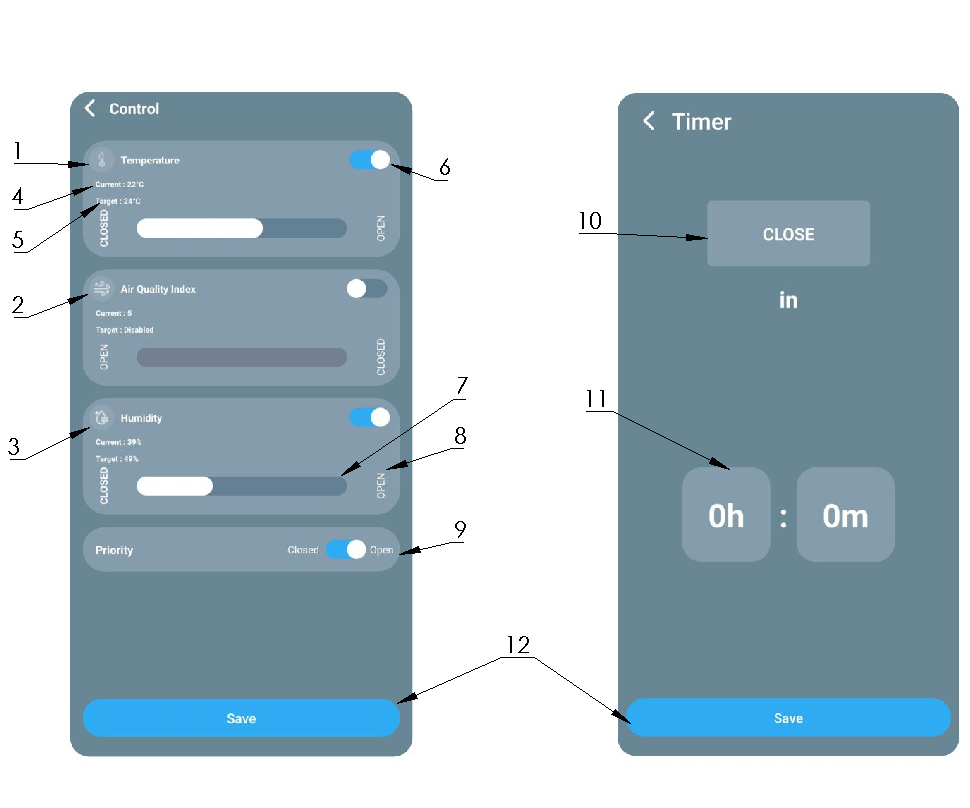
Automatic mode settings
- Temperature level setting block
- Air quality level setting block
- Humidity level setting block
- Current display
- Set condition
- Activating/deactivating condition
- Setting condition
- Window position indicator – press to change
- Priority window state slide – in case of conflicting conditions, the window state selected as priority is preferred
- Action to be performed – click the button to change the action
- Click to set the timer
- Saving actions
Adding to the Matter network
Restart the device and scan the QR code located inside the screw cover using your Matter-compatible app. Follow the on-screen instructions. During commissioning, the Bluetooth connection through the Tarken app must be disconnected.
Please note that controlling the device via the Matter network will disable any Auto or Timer modes previously set up in the Tarken app.
Special cases
Position adjustment
Note: This is required only if Tarken’s moving arm or spindle is not aligned with the window during installation.
Press and hold the center button (2) for 3 seconds. The red LED turns on and Tarken enters arm-adjustment mode. Hold arrow button (1) or (3) to adjust the moving arm’s distance from the anchor. Press the center button (2) again to enter spindle-adjustment mode; the blue LED turns on. Hold arrow button (1) or (3) to align the spindle with the window. Press the center button (2) once more to return to normal operation; both LEDs turn off.
Factory reset
Power Tarken off. Hold arrow buttons (1) and (3), press the center button (2) once, and continue holding both arrow buttons for 3 seconds. The blue and red LEDs blink when the reset is complete. This deletes all saved Matter and Bluetooth connections.
Reverse spindle direction
Note: This is required only for windows with a handle at the top center. Side-mounted handles are detected automatically.
Power Tarken off. Hold arrow button (1), press the center button (2) once, and continue holding arrow button (1) for 3 seconds. The blue LED blinks when the spindle direction has been reversed.
